(Apologies to the knitters: this is all fishtank plumbing. I squeezed it into one post, but it’s *long*. So if you’re looking for sweater updates – it’s nearly done! – or even pretty fish pictures, don’t bother reading. Come back tomorrow. 🙂 )
After several false starts and misdirections over the last many months, we’re finally getting very close to a sump and refugium for the main tank. We originally wanted multipurpose one tank in the bottom of the double tank stand for both purposes. We had a second 55 gallon tank, but it turned out to be too tall for the stand (argh!), so we sold it and the original wood stand to eastside-stitcher-Amanda and Brian, who, I’m happy to see, have put it to great use (love the cat…). Since we needed a tank that would be shorter, but still fit the footprint of the 55g, we decided to split the sump and refugium (technically ideal) and use a 40-Long for the refugium. We finally found one that didn’t need to be back-ordered, and for the last two weeks, I’ve been installing baffles for water flow control and a custom-made sandbox for a 6-8″ deep sand bed. It will also hold macro algae for nutrient removal. The refugium will, ideally, make our tank healthier since we’ll have a greater volume of water and an increase in natural filtration. Also (appealing to us since we’ve had three week+ vacations in the last four months), it will be more self-sustaining when we’re away, especially from an evaporation standpoint.
My “vision” for the refugium was to have a compartment on the left that would house the return pump, a compartment on the right that would receive input water from the sump and contain a thermometer, and a large center compartment that would hold the deep sand bed and macro algae. I delineated the right and left compartments with hanging baffles (13″ tall plexiglass panels fastened to the top of the tank by drilling, and secured at the sides using silicone. Then, I constructed a sand box by making notches at the corners of two more 13″ high plexiglass plates, and connecting them via four long inch-wide plexiglass strips with notches at the ends:
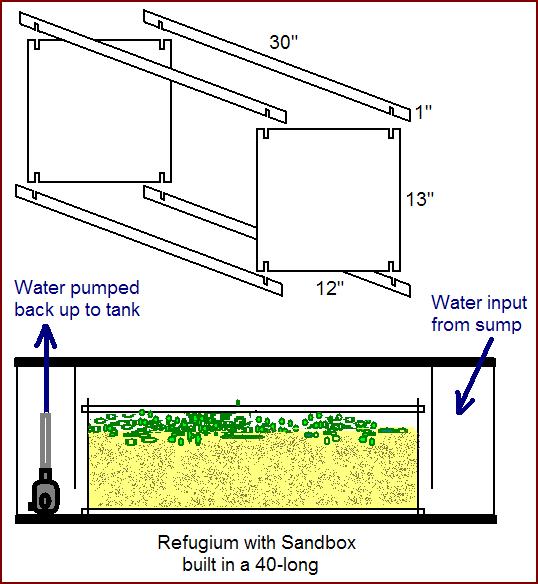
Once this structure was assembled, I could silicone the end plates to the tank walls as well. I was afraid that just baffles without the supports wouldn’t give the structure enough strength to hold the sand in place. It’s not completely sand-proof at the bottom (there’s about 1/8″ gap), but so far seems to be holding the 4″ bed well, and as long as we keep the pumps more than two inches away (which they will be, by design), it doesn’t appear that we’ll have problems with erosion.
I’ve been working for the last few days to fill it with salt water and (so far) two 30 lb bags of sand. We’re using “select” sized aragonite substrate (one up from “sugar” size). As usual, I seem to have “won” the job of washing the stupid stuff a bucket at a time. For those who have never had the pleasure, the sand that comes in bags in fish stores is also full of dust, clay, and assorted detritus that makes it extremely milky when you add water. The only way to get rid of the cloudiness is to wash it (preferably before adding it to the tank, but otherwise via endless sand vacuuming). We learned this the hard way last summer after dumping a bag into our second tank and then waiting four futile weeks for the cloudiness to subside, before the fish store told us to start vacuuming. Each bag contains about 4 partial buckets of sand, which in turn take at least 10 rinses, leaning over swishing around the stuff underneath the tap in the tub. Once the water runs clear, it can be added to the sand in the tank. After two hours of work on Sunday, I have nearly an inch of sand bed, and I made it through another three or so inches on Tuesday night. Needless to say, there’s a lot of work left, and we’ve run out of the sand we had on hand, so there will need to be a fishstore trip for two more bags.

The second part of the setup is the new sump, which is a box that holds the protein skimmer. I designed a very small plexiglass sump that would sit on a table next to the tank and be a way-station on the path down to the refugium. Tap Plastics cut the plexiglass for me, but refused to assemble it due to liability (I shouldn’t have mentioned the phrase “fish tank” – argh again!), so last weekend found me in the kitchen getting weepy off cement fumes while assembling the following:
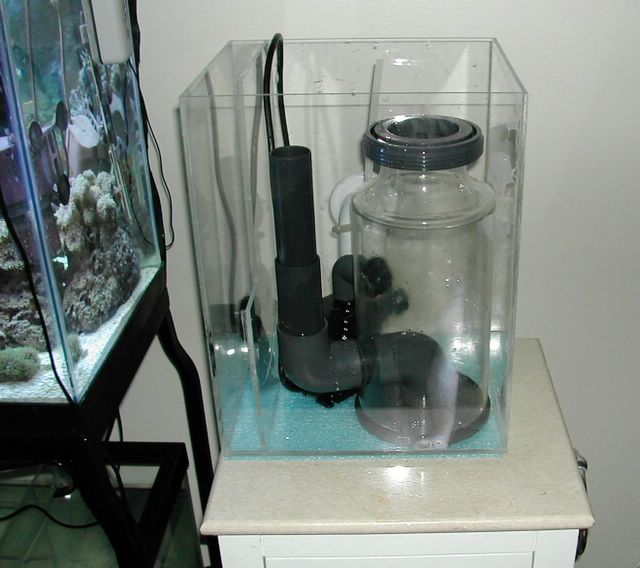
The glue is magical: it’s liquid and goes everywhere, so you apply it using a bottle mounted with a hypodermic needle, then you wait five minutes while it chemically bonds the two pieces of plexiglass. Shockingly, given that I was using phonebooks and old calculus textbooks as my supports, it’s all at right angles and looks, if not professional, then at least like it will hold water. Unfortunately, I got a bit ahead of myself in installing the middle partition, since once it was in, there was no way to install the “out” bulkhead. So, in classic two steps forward, one back fashion, Wednesday night found me taking a hammer to the lovely panel, installing the bulkhead, and re-glueing the center partition. It’s not as pretty as it was, but should (fingers crossed) still be functional and strong. (Such a pity, really, that glued plexiglass isn’t as easy to undo as knitting… at least hammering is satisfying and I didn’t completely shatter it.)
My plan for the sump is drawn below. The only thing we plan to house in it is our skimmer (a wonderful EuroReef ES5-2, powered by a cheap Rio pump.
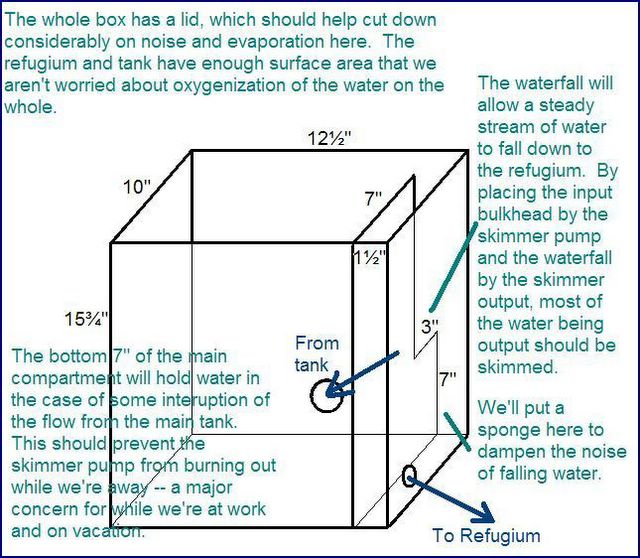
If all goes according to plan, this design will not flood the place if the pump and overflow box aren’t perfectly in sync. Our current solution of this, bred out of desperation after so much travel recently, was to overfill the sump and tank, set up a drip to combat evaporation, and know that even if the power went out, the water would end up in the tub and not all over the floor.

Ideally, I will make it to home depot for the last PVC part and two more feet of flexible tubing tomorrow morning, and can get the old sump deconstructed before people start showing up at 2 for the Superbowl. (eek) And then ultimately — hopefully in the next week or so — we will add our extra live rock (about 15 lbs, currently residing in the quarantine tank), add some live sand (filled with worms and tiny starfish) from the top tank, and plant some algae. Once that is all taken care of, then we’ll be looking for a new little yellow tang, or possibly a lawnmower blenny (aka, according to Kevin, the “Homer Simpson fish”).
Whew.
This is what happens when you hang out with MIT type engineers. Have you given any thought to creating an underwater robot or mini-sub for your fish to play with? Is this fun?