Motivated

Kevin’s family is coming to see us for Christmas (I’m sure this isn’t the first time that I’ve mentioned this) and we are busy bees trying to get things polished for their arrival. It’s such a gift – not only do we not have to be the ones to fly and endure the jetlag (I’m not an early riser in the best of circumstances, and that west-to-east transition is always even harder when 10:00 EST on a weekend is considered “sleeping in”), but we get to show off the new house, wedding gifts, and projects. And, best of all, we actually get to host a holiday. I’m delighted. Each year out here, we’ve gotten a tree and then made the call whether it would burn the place down during our week out east. This year, it’s the real deal. So exciting.

That said, we have a project or two left to finish before they arrive. No surprise. Procrastinator heaven.

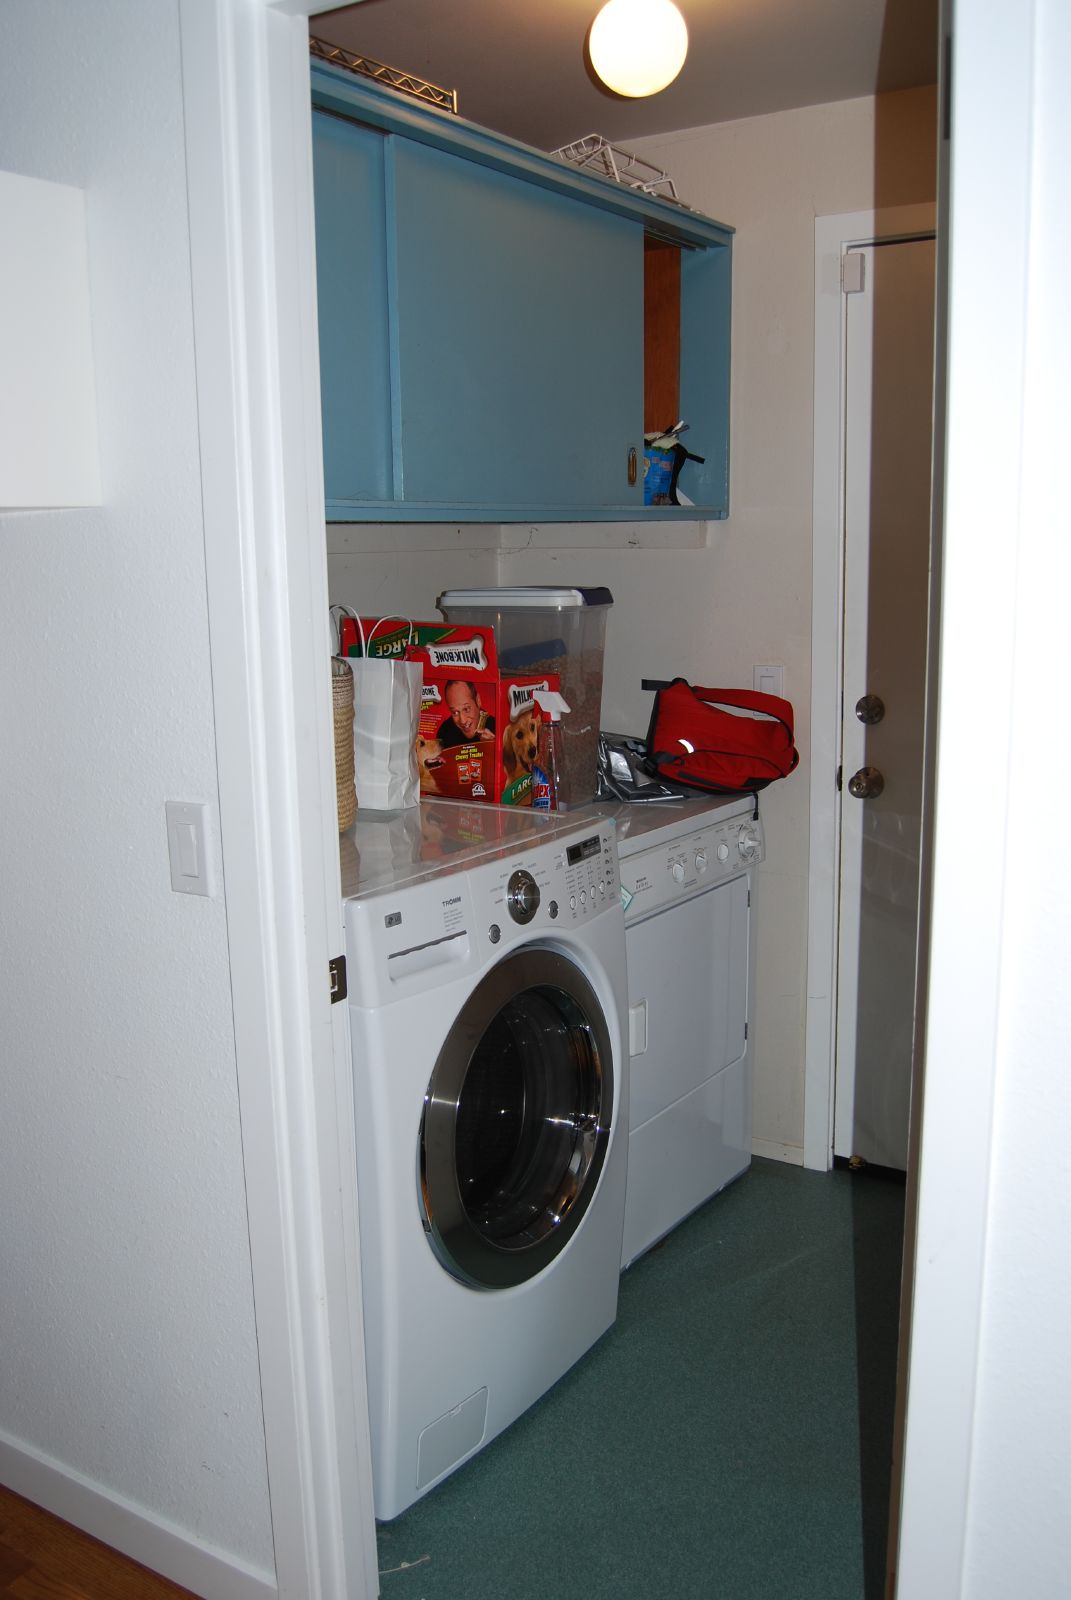
So, Kevin’s been drywalling like a champ. Here he is midway through the first round of joint compound.

Two rounds to go and then we can start priming.

And I’ve been trying to get reengaged with my quilt. I was making great, rapid progress and then we put in the offer on our house and everything ground to a halt about a week before we closed. Now that Kevin’s family is coming, the finished quilt is actually quite important. We have three twin-sized warm covers (a comforter and two quilts), which will work well for me and Kevin (on the daybed and trundle in my office), and his sister on either the blowup mattress, one of the couches, or the futon. But if we take those covers, there’s no warm cover for our queen bed unless I finish up.

No pressure.

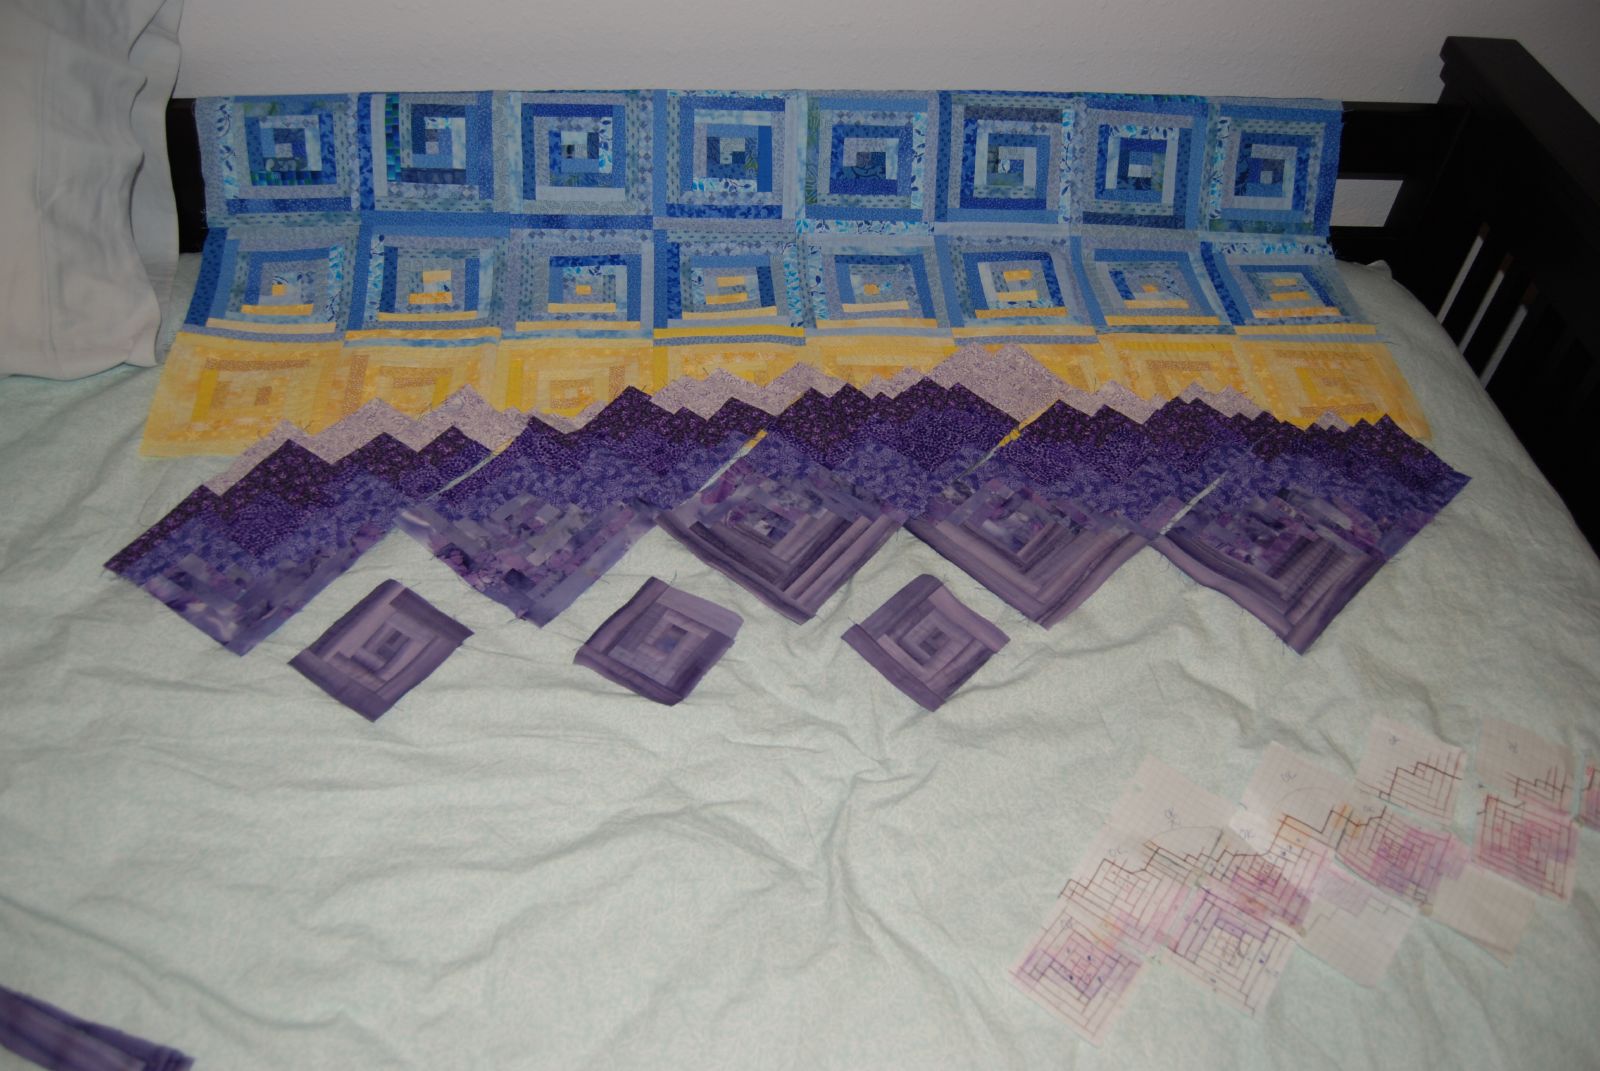
You may remember that I’d sewn the mountain squares into diagonal strips, charted out the three final multicolor squares, and bought new fabric for the mountain base. It took a long time to reconstruct the progress two months later.

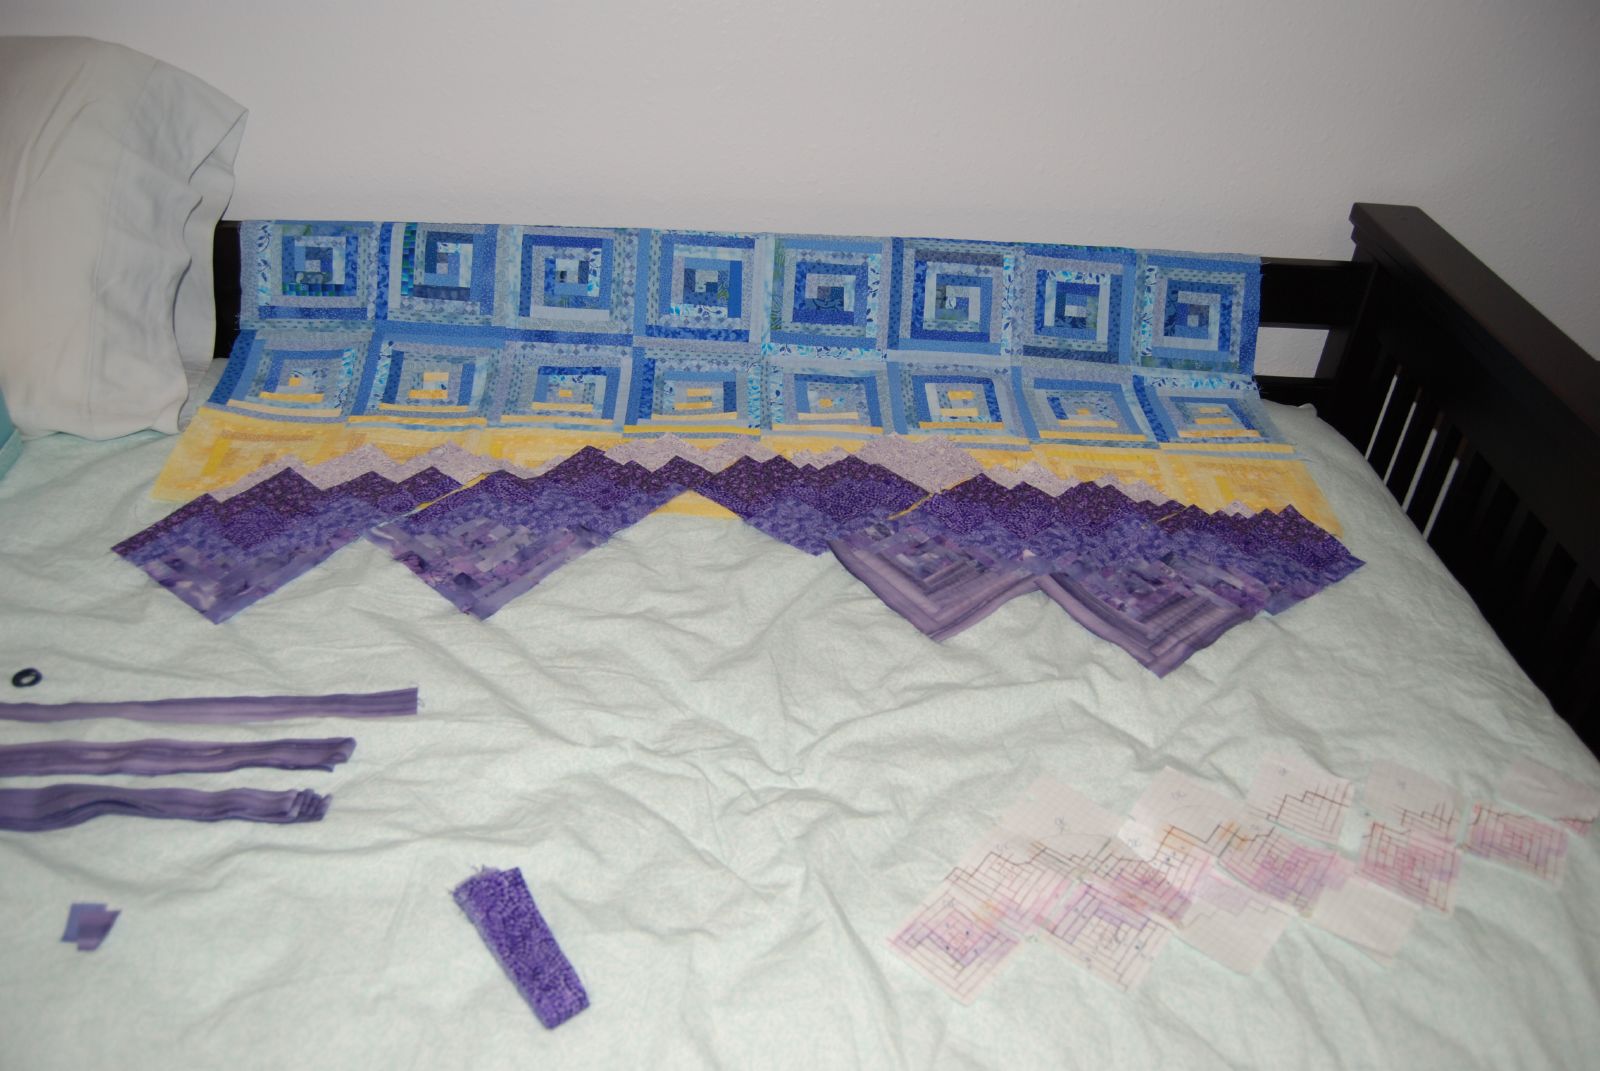
Once I was ready to sew again, I made it partway through the last three solid squares. (I’ll cut them in half and use the triangles to form a straight bottom edge.)

Family Room

Kevin somehow convinced Shawn to help him hang the drywall in the family room, and now we not only have walls all the way around (woot!!), but the rooms’ a step closer to complete.

To summarize the process, Kevin ripped down the ugly, ugly wood paneling in that room on about day two. Once it became clear that the drywall didn’t cover ANY insulation on the lower half of the wall, he ripped down the drywall too.

(I’m still a bit mystified how the old owners lived in this house without freezing. When the furnace is on, it’s a bit too hot for comfort, but the heat just vanishes as soon as the thing turns off, and I spent most of my evenings in hats. I suspect that if you had some sort of infrared scanner, it would illuminate a neat pillar of extremely hot air rising out of our roof every 40 min or so. There’s a saying that a boat is a hole in the water that you throw money into – until we get the new insulation installed in the roof and crawlspace, I feel like our roof is the comparable hole in the sky.)

So, Kevin put up a new foam moister barrier over the exposed foundation…

… and then packs of fiberglass insulation.

You don’t generally say that the insulation looks “pretty”, but the new bottom row in the bump out at least looks neat and well installed. 🙂

Once those steps were done, then Shawn and Kevin measured and cut drywall, and got all of the walls up in an evening. I was impressed both at the speed and at how nice it looks. Both of them were chagrined by how unfailingly non-standard the walls were. Drywall comes in 4’ widths, and 8’, 12’, and 16’ lengths, all of which were always a touch too long or too short.

The next step will be to put up a second layer of drywall and green glue adhesive on our long wall – the goal is to dampen sound more so that the XBox won’t be quite so audible from the master bedroom and the rest of the house.

(You’ll have to excuse the mess. Until the remainder of the drywall is up off the floor, we’re sort of helpless to fix it. Someday, someday…)

Clever guy!

I’ve been writing these posts with a wired connection for the first time in our new house, thanks to Kevin’s Sunday evening project of wiring the bedrooms for internet!

Luckily, he’s braver about the crawl space than I am, since he spent a few hours down there drilling holes and pulling wires from my bedroom to the utility closet which now holds all of our internet switching. Here he is, emerging victorious (a better photo than my new pretty 4-connection ethernet jack):

More painting

I went to town on the master bedroom walls on Sunday. They’ve been patched, spackled, retextured and taped for a few weeks, so it was starting to feel like a hopelessly overdue project. Pictures will be delayed though, since once ½ the room was painted, it became clear that the other half would need to be as well. So, hopefully by the end of the weekend we’ll have pretty shots of another finished room?
I used the remainder of the primer I’d poured out to start attacking the blue walls in the family room. Took longer than it was expecting, but even the ugly, flat primer is such an improvement!

(This has been an unusually slow post to write. Kevin’s working on digging through the stacks and piles of things in his room, and keeps barging in to declare that he’s “throwing away this textbook!!” open to a page of proofs about inverse fourier transforms, or do I “want the unix 5th edition source code?” The worst part is that, typical us, these intrusions keep leading to long conversations about the complexity of Perl vs. Ruby, or the validity of what FakeSteve has to say about Google, and before you know it, another half hour has disappeared.)

Bedroom

I finally have pictures to post of my finished bedroom/office! Since the house has three bedrooms, Kevin and I each get our own room for the time being. Mine’s a smidge bigger, but we’re also using it as a guest room. When our parents or other family members come to visit, we’ve been giving them our bed and retreating to the futon or a mélange of couches. But now, since we have more space, it made sense to find a comfy daybed/trundle combination for the two of us.

In my mind’s eye, I’d been picturing a pretty, sturdy wood set like my parents had in New Hampshire, but they bought those almost a decade ago and either they were regional or no longer exist. After lots of wading through ugly, expensive options, both online and in stores, we decided to buy a Good Trading Company bed through a local wood furniture store (which, unfortunately, I can’t recommend. It’s been all delays, mistakes, and reorders.). The only catch was that in order to get matched head- and foot-boards (which seems to me to be a major style indicator of daybed as opposed to normal twin bed), we actually needed to buy bunk beds, since they don’t sell the components separately. It wasn’t too much more money than a twin bed, and it was way cheaper than custom furniture, so now we’re the (proud?) owners of two extra headboards and the accompanying connective pieces and hardware. The furniture turns out to be quite sturdy and lovely, and a decade or whenever from now, I’m sure we’ll be quite pleased not to have to buy any of this. Since it can either be constructed as bunk beds or two matching twin beds, they’ll certainly be used. And for now, the extra headboards, ladder, and parts can all just slumber in the garage.

So, on to pictures! Our mattresses were delivered in the first week, so here’s the room all blue-taped and with plastic down, ready for me to prime over the cartoon characters.

After two coats of primer, the disneyfication was blissfully removed. I was actually, surprisingly, a fan of the green, but the extra décor just didn’t suit me and it was amazing how soothing that coarse, flat, bright white was.

I painted the walls a light pink/mauve, which (three weeks later) continues to delight me when I walk in the room. The color is Behr’s Phantom Mist (720A-1) in a satin finish. The window faces north-east, and though there are two overhead lights, they’re currently the only illumination in the room. It’s relatively dark, and yet the new paint color seems to lighten things considerably. I also enjoy the contrast of the white baseboard, window and door trim with the pink. My room in middle school and high school had two pink walls, which I always loved, and this just seems like an improvement on the theme. It’s a pleasant room to be in.

Here are all of the day bed parts, unpacked and ready to be used. (We ordered two mattresses, but the trundle bed frame was ordered improperly and the correct pieces won’t show up until mid-December. Aggravating. Consider all of the bed pictures a work in progress.

Once everything was in place, here’s the view of the room from the door. The 11’7”x10’ space holds the new daybed, three bookshelves (a la Target), and my desk. I’ve been thinking about adding a new second desk so that I can quilt and sew without having to move around the computer…

From the desk, here’s the view to the door. The room juts in a bit so that I’m almost entirely blocked from the hallway view. So far, the only art on the walls is the Birches painting that my grandparents gave me. So beautiful.

And with the closet doors opened…

The closet is pretty awesome. The shelves can’t hold too much weight, but I have a few tiny fiberboard bookcases that packed in to hold the heavier things (mostly books and notes from college), and the rest is all crafts and ribbon and old CD cases. All of my elementary/middle/high school things went into three rubbermaid files that are now destined to live in the garage.

Laundry Room Redo!

I don’t have a great “before” picture of the laundry room, since the sellers took their washer and dryer with them, and rooms without appliances always just look so bizarre and empty. But I did take a picture of the room when we were doing the inspection, so I suppose that makes a good before view. Major features of the room include doors to the garage and kitchen, a remnant-vinyl floor (it must have been the end of a roll, since it has brand names stamped all across it), a huge built-in cabinet, and room for a washer and dryer. The corners aren’t perfectly square, but the room is more-or-less 5’3” by 5’6”.

After removing the massive cabinet, Kevin did a fair amount of spackling, I plied off all of the old trim, and then I started painting. For the walls, we chose Behr in Sparkling Spring (730E-2) in a Satin finish. (Kevin’s parents recommended Behr – it’s the Home Depot house brand – as being great to work with for the price. So far, I couldn’t agree more.) We picked up two 30”W x 30”H x 12” D laminate cabinets (both have two adjustable shelves), new baseboard trim, and new vinyl flooring.

I decided to go with sheet vinyl for several reasons. Cost and speed of renovating were obvious considerations. This is for a laundry/mud room floor that sees a lot of traffic, so it needed to be durable and easy to clean. Barring plumbing nightmares, this floor won’t be subjected to tons of water, but the fish buckets will pass through several times a week, so there needed to be something that would hold up to that. Also, the old floor was in good enough shape that a new layer of vinyl could be installed directly on top – VERY appealing, especially since we don’t know how old the existing floor was (if before 1986, it probably contains asbestos, which obviously isn’t something we wanted to be ripping into). Also, vinyl sheeting comes in 6’ widths, which was perfect for this project. So, vinyl sheeting it was.

I found a pretty pattern, with little blue diamonds on a white background, but it ranged from 1.50 a square foot with a three week wait, to $2.89 per sq ft with a two week wait… Not ideal. Then, Home Depot came through again, since they sell 6’ x 8’ rolls for $20 – not a huge pattern selection, but I found one that I really liked and we were off and running. I bought a 3/16” v-notched trowel and the adhesive, and rented a 75-lb roller. The installation went surprisingly well. Kevin removed the door to the garage for ease of access and I sawed about an eighth of an inch off the bottom of each of the door frames so that the sheet could slide underneath. The adhesive was increasingly messy to work with until I got a cup of hot water – that and a paper towel solved everything when a little bit went awry. I installed new floor tacks, and then the new trim, and now I love this room.

Pretty, right? 🙂

I’m particularly proud of us for hanging the cabinets level and appropriately close together without incident. 🙂

(Sorry for the dreadful lighting in that one — it’s what you get when you take pictures at midnight.)

The new washer and dryer showed up the next day. We’re both getting a kick out of them. We ended up with the LG WM2455 (the only 4.0 cubic foot front washer that was shallow enough to fit in the room. Thankfully, consumer reports had great things to say about it!) and the matching dryer. The two of them are a riot. I would love to know what sort of market research went into the design, but it resulted in a cross between an arcade game and a huge laundromat washer. When you turn the washer on, lights flash and it sings a little “yay, we’re about to do laundry!!” song. Select your cycle, and it spends a few moments earnestly sensing its load, and then goes on its merry way. When it finishes, you get another triumphant little melody (perhaps it’s calling to the dryer? “This was such fun! And now it’s your turn!!”), and then repeat all of the lights and singing for your dryer run. I would have thought the noise would be annoying, but it keeps making us laugh and so we haven’t turned it off yet.