Vacation knitting

Last night, I finished the second front for the cabled sweater, which means that with the exception of the collar, all of the knitting should have been done. However, there were a few nagging details that needed to be addressed. First, the original pattern called for four buttons. Despite lengthening the body by nearly double the original pattern, I still kept the four button design. However, my math was way off when I decided how far apart to space them. (Assuming that I even did math to begin with? I don’t remember, I may have just more or less estimated where they should go, which would explain a lot.) Rather than reknit, I just pulled back the three stitches involved by about eighty rows, then used a crochet hook to redo them correctly. The whole process took about an hour, and untangling the mohair to rip the stitches down accounted for at least half of that. I was surprised how easy it was to rework them. I usually have trouble ripping down adjacent stitches because it’s hard to make the tension even on the redo. I think the fact that it’s 1×1 ribbing helped a lot.

Here’s a during (left) and after (right):

Clearly this isn’t blocked yet. Isn’t it amazing how much yarn the three stitches consume? When stretched out, it was nearly two inches. It seemed amazing that it all got used up again when I crocheted it back up.

Then, this morning, I reveled in the first of four days of unemployment before my new job starts (yay, vacation!) by going back and taking a look at the sleeves. They’ve always looked to be slightly different sizes, and sure enough, I had missed a paired increase at the elbows and omitted about 15 rows before the sleeve cap. Must have mentally wandered off there, huh? So now my “finished” sleeves look like this:

Luckily it’s all easy quick stockinette, so with the bulky yarn I should be done knitting (again) by tonight barring further mishaps. 🙂

DIY Sump and Refugium update

(Apologies to the knitters: this is all fishtank plumbing. I squeezed it into one post, but it’s *long*. So if you’re looking for sweater updates – it’s nearly done! – or even pretty fish pictures, don’t bother reading. Come back tomorrow. 🙂 )

After several false starts and misdirections over the last many months, we’re finally getting very close to a sump and refugium for the main tank. We originally wanted multipurpose one tank in the bottom of the double tank stand for both purposes. We had a second 55 gallon tank, but it turned out to be too tall for the stand (argh!), so we sold it and the original wood stand to eastside-stitcher-Amanda and Brian, who, I’m happy to see, have put it to great use (love the cat…). Since we needed a tank that would be shorter, but still fit the footprint of the 55g, we decided to split the sump and refugium (technically ideal) and use a 40-Long for the refugium. We finally found one that didn’t need to be back-ordered, and for the last two weeks, I’ve been installing baffles for water flow control and a custom-made sandbox for a 6-8″ deep sand bed. It will also hold macro algae for nutrient removal. The refugium will, ideally, make our tank healthier since we’ll have a greater volume of water and an increase in natural filtration. Also (appealing to us since we’ve had three week+ vacations in the last four months), it will be more self-sustaining when we’re away, especially from an evaporation standpoint.

My “vision” for the refugium was to have a compartment on the left that would house the return pump, a compartment on the right that would receive input water from the sump and contain a thermometer, and a large center compartment that would hold the deep sand bed and macro algae. I delineated the right and left compartments with hanging baffles (13″ tall plexiglass panels fastened to the top of the tank by drilling, and secured at the sides using silicone. Then, I constructed a sand box by making notches at the corners of two more 13″ high plexiglass plates, and connecting them via four long inch-wide plexiglass strips with notches at the ends:
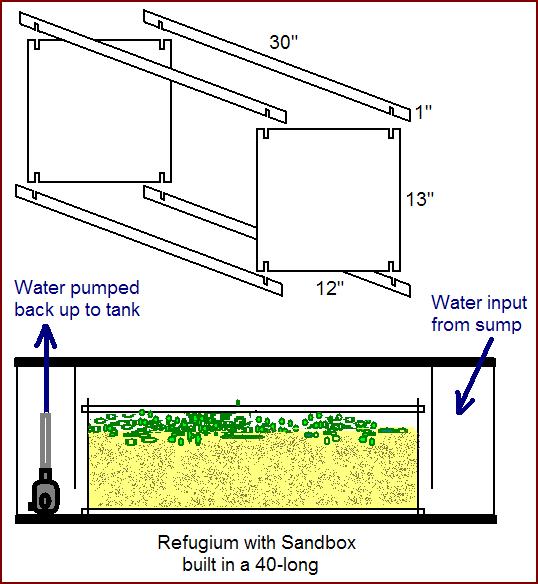
Once this structure was assembled, I could silicone the end plates to the tank walls as well. I was afraid that just baffles without the supports wouldn’t give the structure enough strength to hold the sand in place. It’s not completely sand-proof at the bottom (there’s about 1/8″ gap), but so far seems to be holding the 4″ bed well, and as long as we keep the pumps more than two inches away (which they will be, by design), it doesn’t appear that we’ll have problems with erosion.

I’ve been working for the last few days to fill it with salt water and (so far) two 30 lb bags of sand. We’re using “select” sized aragonite substrate (one up from “sugar” size). As usual, I seem to have “won” the job of washing the stupid stuff a bucket at a time. For those who have never had the pleasure, the sand that comes in bags in fish stores is also full of dust, clay, and assorted detritus that makes it extremely milky when you add water. The only way to get rid of the cloudiness is to wash it (preferably before adding it to the tank, but otherwise via endless sand vacuuming). We learned this the hard way last summer after dumping a bag into our second tank and then waiting four futile weeks for the cloudiness to subside, before the fish store told us to start vacuuming. Each bag contains about 4 partial buckets of sand, which in turn take at least 10 rinses, leaning over swishing around the stuff underneath the tap in the tub. Once the water runs clear, it can be added to the sand in the tank. After two hours of work on Sunday, I have nearly an inch of sand bed, and I made it through another three or so inches on Tuesday night. Needless to say, there’s a lot of work left, and we’ve run out of the sand we had on hand, so there will need to be a fishstore trip for two more bags.

The second part of the setup is the new sump, which is a box that holds the protein skimmer. I designed a very small plexiglass sump that would sit on a table next to the tank and be a way-station on the path down to the refugium. Tap Plastics cut the plexiglass for me, but refused to assemble it due to liability (I shouldn’t have mentioned the phrase “fish tank” – argh again!), so last weekend found me in the kitchen getting weepy off cement fumes while assembling the following:
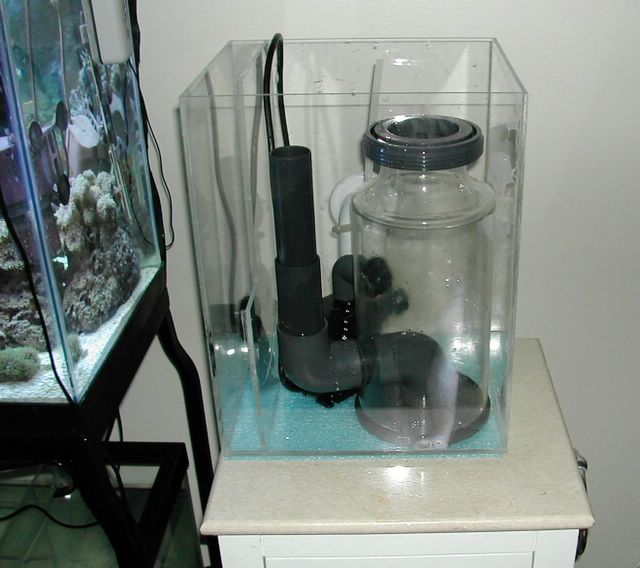
The glue is magical: it’s liquid and goes everywhere, so you apply it using a bottle mounted with a hypodermic needle, then you wait five minutes while it chemically bonds the two pieces of plexiglass. Shockingly, given that I was using phonebooks and old calculus textbooks as my supports, it’s all at right angles and looks, if not professional, then at least like it will hold water. Unfortunately, I got a bit ahead of myself in installing the middle partition, since once it was in, there was no way to install the “out” bulkhead. So, in classic two steps forward, one back fashion, Wednesday night found me taking a hammer to the lovely panel, installing the bulkhead, and re-glueing the center partition. It’s not as pretty as it was, but should (fingers crossed) still be functional and strong. (Such a pity, really, that glued plexiglass isn’t as easy to undo as knitting… at least hammering is satisfying and I didn’t completely shatter it.)

My plan for the sump is drawn below. The only thing we plan to house in it is our skimmer (a wonderful EuroReef ES5-2, powered by a cheap Rio pump.
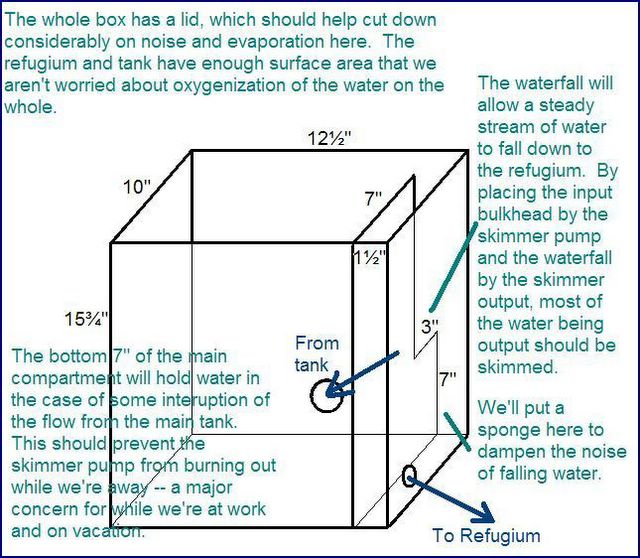
If all goes according to plan, this design will not flood the place if the pump and overflow box aren’t perfectly in sync. Our current solution of this, bred out of desperation after so much travel recently, was to overfill the sump and tank, set up a drip to combat evaporation, and know that even if the power went out, the water would end up in the tub and not all over the floor.

Ideally, I will make it to home depot for the last PVC part and two more feet of flexible tubing tomorrow morning, and can get the old sump deconstructed before people start showing up at 2 for the Superbowl. (eek) And then ultimately — hopefully in the next week or so — we will add our extra live rock (about 15 lbs, currently residing in the quarantine tank), add some live sand (filled with worms and tiny starfish) from the top tank, and plant some algae. Once that is all taken care of, then we’ll be looking for a new little yellow tang, or possibly a lawnmower blenny (aka, according to Kevin, the “Homer Simpson fish”).

Whew.

New job, pretty yarn

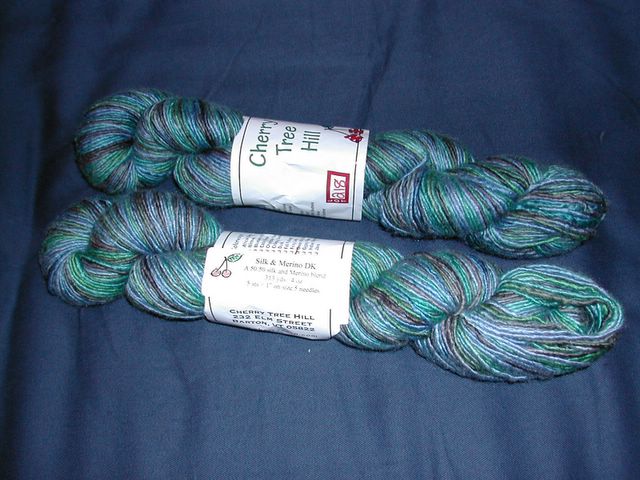
Want to see my extravagant new yarn?

It’s two skeins of Cherry Tree Hill Silk & Merino DK, in Green Mountain Madness. It’s *deeply* gorgeous, and it feels amazing. Once I’m done admiring it in the skein, (and probably once the Olympics are over) it will become a clapotis. 🙂 So, you ask, what could have happened to the girl who usually tries to complete sweaters for less than $40, to have made her drop twice that for one lone scarf?

This is celebrational yarn, because I just signed a contract on a job that I’ve wanted for a long, long time! Some people do a fancy dinner out, some people buy expensive electronics, and I splurged on yarn. In two weeks, I’ll be starting as a Programmer Writer at Microsoft, and I think that’s worth of a bit of loveliness. Plus, I have a hunch that I’ll need a nice, easy pattern in a soft, pretty yarn to come home to — the learning curve for the first few weeks looks rather steep, and I sense my brain will appreciate the break. 🙂 So, cheers to dream jobs!

Back in the saddle

Now that the socks and pillows are out of the way, the next project on the list is finally finishing the purple cable sweater. I lost momentum when I realized I didn’t have enough yarn to finish, and by the time I found more (same dye lot, no less!), I’d forgotten where I was in the cable chart. So last night before bed, I took fifteen minutes to re-find my place and knit a few rows to get back in the swing. I have two thirds of the right front and under one third of the left front left to go. Once those two pieces are finished, I just have to block and seam. There are no finishing details except for sewing on the four buttons.

Now that I am past my knitter’s block, I’m completely remembering why I loved this yarn and project to begin with. The Lambs Pride Bulky is heavenly to work with — soft and squishy, and the inches fly by. I’m hoping to have this done too before the Olympics start and I have to put it down again. A second time-trial?

More than you ever wanted to know about pillows

Yesterday, with the help of a wonderful librivox recording of A Little Princess (one of my childhood — and for that matter, adulthood — favourites), I went on a pillow-making spree. A bit ago, Kevin moved all of his computer and tech stuff downstairs and we moved the futon upstairs, and I made it as far as buying some bar stools to covert into ottomans, painting them, and draping quarter yard cuts of fabric all over everywhere before the holidays hit and I lost momentum. On Thursday night, I finally took the sewing machine back out and started working again. I finished the full set of pillows at the beginning of the final chapter. Perfect timing.

There are two kinds of pillows: two round ones for atop the stool-ottomans, and two square ones for the futon. My major objectives in making these were (1) arts and crafts project! (2) to make the ottomans more comfortable, and (3) to tie together the different/clashing-blues butterfly chairs and futon cover. I also have a lovely throw on the futon which is different shades of periwinkle, and I wanted to play off that.

Unfortunately (keep this in mind as you view the pictures), my camera just can’t deal with that purple-blue periwinkle color, so it looks like I am a color-blind mess. It’s such a pity, because they turned out so well, but the pictures just didn’t come out. I’m sure the fact that the flash was required (even in daylight! Seattle winters are wearing on me.) doesn’t help, but you’ll have to imagine that everything goes. Here’s the view of the futon:

(Keep in mind that the stool legs should match the piping, and the pillows perfectly pick up the different periwinkles in the throw.)

For the square pillows, I used the striping pattern from Crate and Barrel’s Brighton Pillows. I’m thrilled with the way they turned out, and Kevin’s been raving about how you can’t buy anything this nice in stores (:-) !!), so they were an unqualified success.

I used a pretty wide range of fabrics, including silk and corduroy. If I had to choose fabrics again, the corduroy probably wouldn’t have made it in, but the color and texture at least match the throw perfectly. Many of the fabrics were very slippery, so the seams were reasonably time intensive due to all of the pins needed.

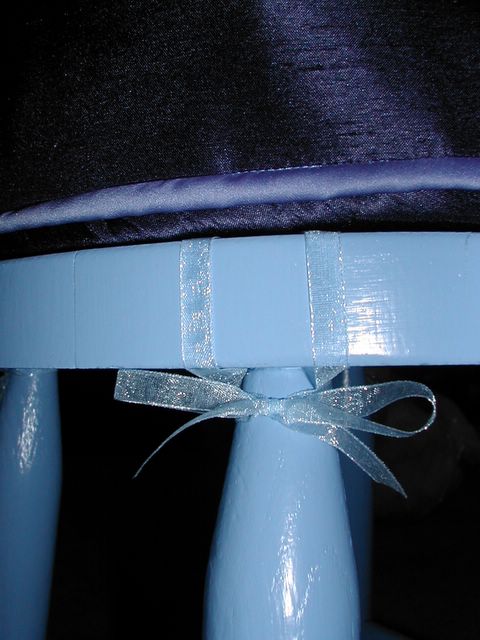
The round pillows are far less professional looking. I made my own piping, out of the shiny periwinkle fabric that I used for the slim stripes in the square pillows. I then tried to cut foam to match the top of the stools. (Cutting 2.5″ foam into a perfect circle is so hard!! I have no idea how you’re supposed to do it, and my attempts were pretty ugly.) Then I cut fabric to make a short cylinder of a pillow, with a slit in the back to put the foam in. This was really hard to do without making the fabric bunch, and I spent as much ripping back as I did pinning and sewing. Once the covers were all assembled, I used the *so* cool automatic buttonhole maker attachment for my sewing machine to make four pairs of button holes in the bottom of each cushion, and threaded 1/4″ organza ribbon through them to make ties to hold the cushions on to the chair.

The end result is definitely homemade, not the crisp loveliness of my mind’s eye, but they’re functional and colorful.

(again, remember that the piping and paint are in reality a perfect match, not the grisly aqua and purple shown above. eek.)

I feel so accomplished. 🙂 On to the next project!

A Successful Time Trial

Your eyes are not deceiving you — this is, in fact, a completed pair of socks:

Now that I’m flush with victory, the process (all thirteen and a half months of it) really wasn’t that bad. I’m not sure another pair of vanilla rib socks are in my near future, but I’m suprised to find that I enjoyed the home stretch.

I used the “Plain Rib Socks” pattern from the Patons classics Winter Warmth booklet (#500977 HH, if you’re really interested). The construction seems really solid and they fit Kevin well, but the name really says it all. I used Patons Kroy yarn, and did the first sock on four #2 DPNs and the second using magic loop on a 32″ Addi Turbo. After having tried the Addi’s, I doubt I will ever use DPNs again (they are *SO* fidgety!), but I’m happy to have tried both.

Now on to the Knitting Olympics!

Happy Belated Birthday, Clowns

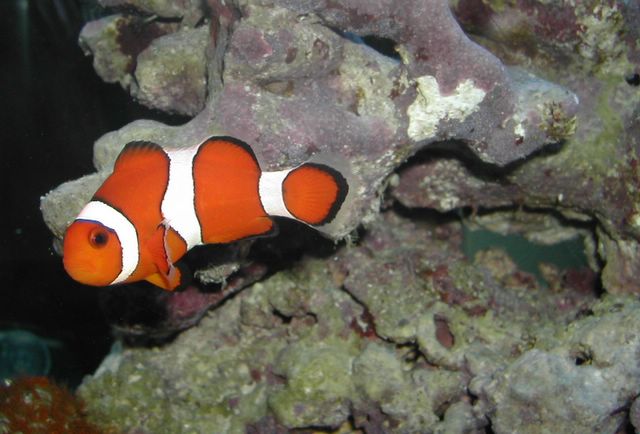
All that’s left on the sock is 14 stitches worth of kitchener and weaving in 2 ends, so while you wait with bated breath for that, want to see a great picture of Click?

He’s our mellow fish. The gramma is cranky, Clack (our other clown) is curious and loves to eat, but Click just sort of hangs out and keeps an eye on the shrimp for us. I was amazed to realize that we’ve now had them for over a year.

We are definitely seeing a marked size difference between the two clowns. For those who didn’t know, clownfish are protandrous hermaphrodites, which means that over their lifetime they gradually change from gender-neutral to male to female. Given two males, they will duke it out so that one stays male and the other gets to become the dominant female — it’s clear which is which, because the female is about three times the size of the male and much more aggressive. Clack is definitely becoming the female, and Click shows submissive behaviour like twitching (which was scary until we read about it as a developmental norm.)

Standing Corrected

Logic kicked in on Wednesday afternoon when I realized that I was planning to knit a scarf with only 216 yards of yarn. Hmm. I’m really not clear how much yarn a scarf knit at 5 stitches per inch should consume, but my research (thank you, internet) suggests that for a 7″ scarf in more-or-less stockinette, I will need about 400 yards.

Since my knitting group has switched back to Bellevue now that the holiday traffic has thinned out it was on the way to visit Hilltop East, where I bought the two original skeins. I raced there (if you can call sitting in traffic at every light racing… ah, Seattle), squeezed in the door thirty seconds before they closed, and found that they did in fact have two more skeins of my color. I should have called ahead, but since I didn’t, this all felt miraculous. I’d decided on the ride over to just ignore the dye lot — dangerous for red, but I bought the original skeins over two months ago, and I figured that I could use dye lot A for the ends, and B for the middle, and it would work.

So it was very exciting to get home and realize that they all shared the same lot number. This project is blessed. 🙂

And only two more inches before the toe decreases for the sock. There’s a Puget Sound Aquarium Society lecture on Nano tanks on the Olympic peninsula, so I’m hoping that between car and ferry time, I may be able to finish! 🙂

How Neat

In the course of my travels, I came across the neatest site today: librivox.org. It’s a volunteer project to make audio recordings of books in the public domain. Especially for the non-tv-watching knitters out there, this could be a bonanza. 🙂 My mom (and for a few books, my dad) read aloud before bed until I reached high school, and it always used to double as knitting or sewing time. I haven’t listened to the recordings to gauge their quality, but it would be fun on non-Grey’s Anatomy nights to have a book to listen to. I’ve tried listening to the online books available from my public library, but so far it’s seemed more of a hassle than it’s worth (mostly due to the search capabilities of the website — too hard to find anything interesting).

In light of the extremely interesting copyright discussion tonight in my knitting group, plus a general desire to do the right thing, I’m hoping that their interpretation of public domain is accurate — can anyone with a better sense of copyright law/internet karma/publishing rules comment?

Unfortunately, I’m in the midst of job and school applications which require my attention*, so this will be a more exciting find in a week or two once I have a bit more luxury time in the evenings. In the meantime, I’m hoping that more of the works in progress are finished — there are some great options listed.

* Know of any technical writing jobs in the Seattle area? I’m very interested.

Faster, Higher, Stronger

As I’m sure all of the knitters in the known world are aware, the Yarn Harlot recently decided to host a Knitting Olympics. While speed knitting is not generally my forte, this quest sounded wildly appealing (not only will I start and maybe finish a project, but it will be community-oriented and provide blog fodder! awesome!). I signed up with the following comment:

I have a red beaded scarf (yarn, beads and pattern) that has been sitting and waiting for me to finish my first pair of socks… So, a dual challenge: first the time trial to get on the team (I’m just through the heel turn on sock #2, there’s hope), then the olympic knitting effort itself. I’m even color-appropriate: blue socks and red scarf (go USA!), and the red can do dual service as a tribute to our host country, Canada. 🙂

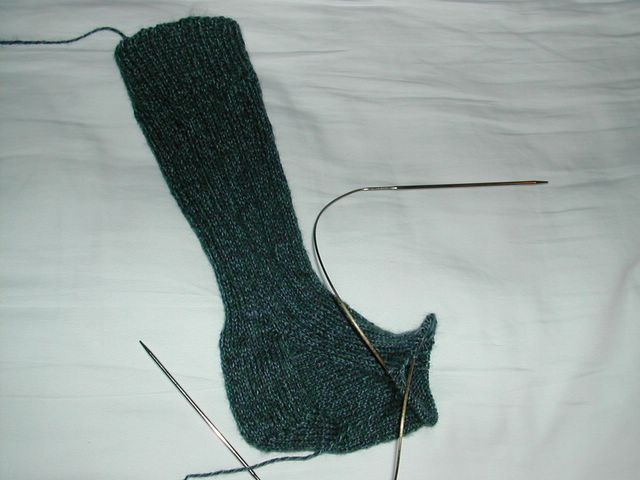
So that it’s clear what I’m working with, here’s the sock status as of about 11 pm last night:

I am actually making excellent progress, and am finally on the straight-away after the heel turn so I can knit while I read without stopping to count.

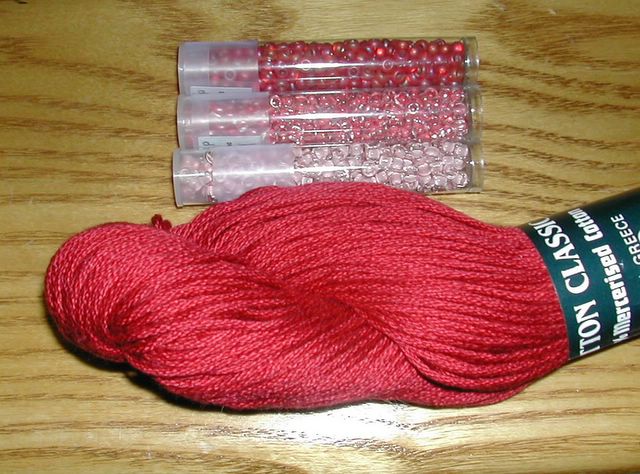
The project that has been calling to me is a variation on the Cascading Diamonds Scarf from Knitting with Beads. (This picture from the very neat google books is the only one I could find — the purple project in the upper left corner shows the bead detail.) I’m going to use my red Cotton Classic that I bought with the gift certificate my brother and sister gave me for Christmas last year, plus three colors of beads. I can’t wait to start.

This picture was taken at night, and as usual with red, isn’t completely true to the colors — it real life the yarn is a little bit darker and a bit less fluorescent. I love the way they look together.

Does stringing the beads count as starting?